Camera ↔ LNS Guide
This guide walks you through the process of calibrating local navigation systems (LNS, aka odometry) using MetriCal. Local navigation systems are represented by odometry messages, and provide precise positioning in indoor or GPS-denied environments.
Example Dataset and Manifest
We'd like to give a special thanks to our friends at NVIDIA for letting us borrow a Nova Carter robot to capture the example dataset used in this guide. If you're using your own Nova Carter, you should be able to use recorded data from it directly with MetriCal.
If it's your first time performing a local navigation system calibration using MetriCal, it might be worth running through this dataset once just so that you can get a sense of what good data capture looks like.
This dataset features:
- Observations as an MCAP
- Four color cameras
- One local navigation system (odometry stream)
- One lidar
- Two markerboard targets
The Manifest
[project]
name = "Pacifica Pipeline"
metrical-version = "18.0.2"
version = "0.1.0"
description = "Pipeline for running MetriCal on the local nav pacifica dataset"
workspace = "metrical-results"

[stages.pacifica-new]
command = "plex-new"
output-plex = "{{auto}}"

[stages.pacifica-learn]
command = "plex-learn"
input-plex = "{{pacifica-new.output-plex}}"
dataset = "local_nav_pacifica.mcap"
topic-to-model = [["*compressed*", "eucm"], ["*lidar*", "lidar"], ["*odom*", "lns"]]
output-plex = "{{auto}}"

[stages.pacifica-calibrate]
command = "calibrate"
dataset = "local_nav_pacifica.mcap"
input-plex = "{{pacifica-learn.output-plex}}"
input-object-space = "local_nav_pacifica_objects.json"
camera-motion-threshold = "disabled"
lidar-motion-threshold = "disabled"
overwrite-detections = true
override-diagnostics = true
show-results = false
time-sync = true
render = false
detections = "{{auto}}"
results = "{{auto}}"
Again, not too much going on here. We'll be using EUCM on the cameras to make sure we cover the wide field-of-view, but beyond that, it's a pretty standard manifest.
Running the Manifest
With a copy of the dataset downloaded and the manifest file created, you should be ready to roll:
metrical run local_nav_pacifica_manifest.toml
You'll see this output before the optimization step begins:
  × Motion profile issues detected for LNS /chassis/odom (55c18322):
  │   - Limited velocity change (condition number > 100)
  │   - Limited angular velocity change (condition number > 100)
  │   - Insufficient variance in velocity measurements
  │   - Insufficient variance in angular velocity measurements
  │   - Motion deficient in a single axis in velocity
  │   - Motion deficient in a single axis in angular velocity
  help: The LNS motion profile analysis detected issues with the trajectory of this LNS. Please review the
        detected issues and consider re-collecting data with improved motion characteristics.

        If you would like to process the rest of this calibration, re-init the plex without this component
        and rerun the calibration.
...which is true, actually! This dataset was captured with a Nova Carter, which those with keen eyes will recognize as a vehicle that drives, rather than flying. This means that its motion is mostly planar, which is not ideal for LNS calibration.
MetriCal will still proceed with the calibration, but it's worth noting that the results may not be as good as they could be with a more exciting motion profile.
When the run finishes, you'll be left with three artifacts:
output-plex.json: The learned plex from the first stage.report.html: a human-readable summary of the calibration run. Everything in the report is also logged to your console in realtime during the calibration. You can learn more about interpreting the report here.results.mcap: a file containing the final calibration and various other metrics. You can learn more about results here and about manipulating your results usingshapecommands here.
And that's it! Local navigation system calibration is a bit simpler than other sensor calibrations, so you should be able to run through this example quickly. Hopefully this trial run will have given you a better understanding of how to capture your own local navigation system calibration.
Data Capture Guidelines
Maximize View of Object Spaces for Duration of Capture
Similar to IMU, LNS calibration is done by comparing the world pose (or world extrinsic) of the camera between frames to the interpolated motion of the local navigation system.
Because of how this problem is posed, the best way to produce consistent, precise LNS ↔ camera calibrations is to maximize the visibility of one or more targets in the object space from one of the cameras being calibrated alongside the LNS. Put in a different way: avoid capturing sections of data where the LNS is recording but where no object space or target can be seen from any camera. Doing so can lead to misleading bias estimates.
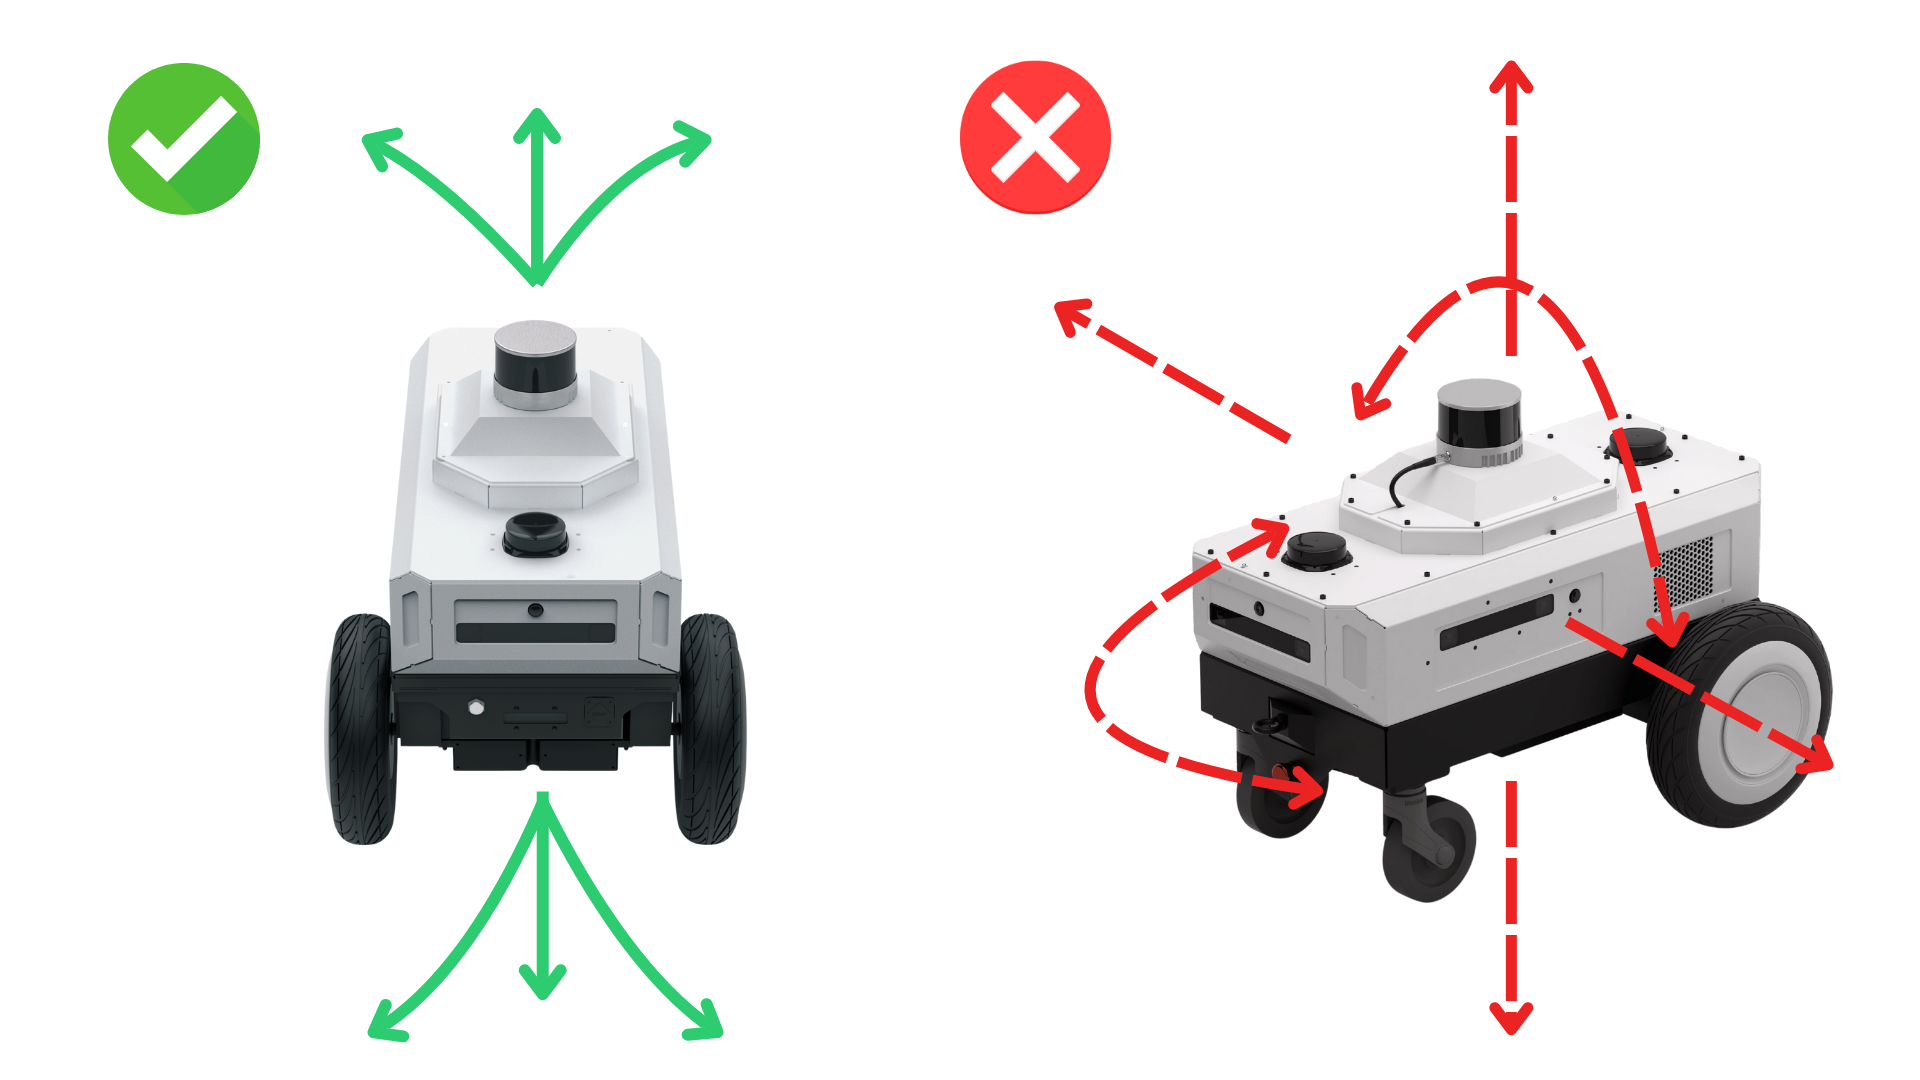
Excite All Axes During Capture
LNS calibrations are no different than any other modality in how they are entirely a data-driven process. In particular, the underlying data needs to demonstrate observed translational and rotational motions in order for MetriCal to understand the motion path that the LNS has followed.
This is what is meant by "exciting" an LNS: accelerations and rotational velocities must be observable in the data (different enough from the underlying noise in the measurements) so as to be separately observable from e.g. the biases. This means that when capturing data to calibrate between an LNS and one or more cameras, it is important to move the LNS in all 6 degrees of freedom. This motion can be repetitive so long as a sufficient magnitude of motion has been achieved.
We suggest alternating between periods of "excitement" or motion with the LNS and holding still so that the camera(s) can accurately and precisely measure the given object space.
If you find yourself still having trouble getting a sufficient number of observations to produce
reliable calibrations, we suggest bumping up the threshold for our motion filter heuristic
when calling metrical calibrate. This is controlled by the --camera-motion-threshold
flag. A value of 3.0 through 5.0 can sometimes improve the quality of the calibration a
significant amount.
Reduce Motion Blur in Camera Images
This advice holds for both multi-camera and LNS ↔ camera calibrations. It is often advisable to reduce the effects of motion in the images to produce more crisp, detailed images to calibrate against. Some ways to do this are to:
- Always use a global shutter camera
- Reduce the overall exposure time of the camera
- Avoid over-exciting LNS motion, and don't be scared to slow down a little if you find you can't detect the object space much if at all.
Troubleshooting
If you encounter errors during calibration, please refer to our Errors and Troubleshooting documentation.
Remember that all measurements for your targets should be in meters, and you should ensure visibility of as much of the target as possible when collecting data.